Slave
PC side
If you
have installed with "Setup.exe", the slave program has been
already started.
Otherwise,
start "RCSlave.exe".
Master
PC side
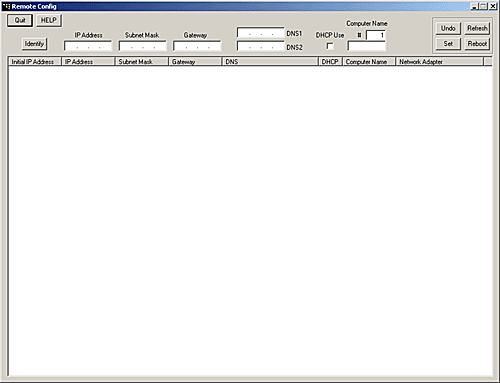
Start
"RCMaster.exe" and you see a windows as below.
Input
Box
- IP Address
- Subnet Mask
- Gateway
- DNS (Primary, Secondary)
- DHCP
- Computer Name (NetBIOS, DNS Name)
Quit button
............. Quit the program.
HELP button
........... Show Help File.
Identify button ........
Display a window on a client to show the present network settings.
Undo button
............. Undo the configuration.
Set button
................ Send
the network settings to the slave PC.
Refresh button
....... Refresh the content of the slave list.
Reboot button
......... Reboot the slave PC.
You can shutdown too.
Slave
List
When
the master program starts, All slave PCs
are detected automatically and added to the slave list.
You
can sort the contents. To sort, click the column title you wish to
sort as a key. The sort order is switched at each click.
You
can select more than one client in the list with the combination of
[Ctrl] and [Shift] key.
You
can select all slaves at one time as you double-click
on the list.
You
can copy the current setting of a slave to the input box. To copy, right-click
the slave.
After
the copy, you can edit the each data.
When
you reboot or shutdown a slave, the slave data is deleted from the
list automatically. (Automatic Refresh)
So
you can know which slave PCs are active at present.
If
you don't wish "Automatic Refresh", you can disable the
function by starting the program with option string.
Start
"RCMaster.exe" with option "-r". (RCMaster.exe -r)
You
can refresh the list by clicking [Refresh] button at any time.
Operation
Guide
Follow
these
steps
below to configure a slave
1)
Set the network data to each input box..
2)
Select the target slave in the list. If you select more than one
slave, a special rule is applied (mentioned later)
3)
Click [Set] button to send the data to the slave.
You can confirm the changed contents in the list immediately.
At this stage, you can cancel the change. To cancel, select the
slave and click [Undo] button.
The contents return to the initial state.
4)
Restart the slave to enable the change.
Select the slave and click [Reboot] button.
If you click [Reboot] button with holding down [Sift] + [Ctrl] key,
the slave is shut-down.(Power-off)
Change
Rule
When
you send the data to the slave, the following rule is applied
according to the contents of the data and the number of the slaves
you select.
1.
When DHCP is OFF
and only one slave
is selected
- IP Address ............ The data is set as it is. If the item is
blank, no change is done.
- Gateway ................. The data is set as it is. If the item is
blank, the Gateway data of the slave is erased.
- Subnet Mask ........ The data is set as it is. This item is
essential. The balnk is not allowed.
- DNS ........................ The data is set as it is. If the item
is blank, the DNS data of the slave is erased.
- Computer Name .... The data is set as it is. If the item is blank,
no chang is done.
2.
When DHCP is ON
and only one slave
is selected
- IP Address ............ Unable to input.
- Gateway ................. Unable to input.
- Subnet Mask ........ Unable to input.
- DNS ........................ The data is set as it is. If Both of
the DNS data are blank, DNS is set to blank or "Auto-Obtain".
- Computer Name .... The data is set as it is. If the item is blank,
no chang is done.
3.
When DHCP is OFF
and more than one slave
are selected
- IP Address ............ A serial IP address starting from the
inputted data is assigned to each slave in descending order.
If the item is blank, no change is done.
- Gateway ................. The data is set as it is. If the item is
blank, the Gateway data of the slave is erased.
- Subnet Mask ........ The data is set as it is. This item is
essential. The balnk is not allowed.
- DNS ........................ The data is set as it is. If the item
is blank, the DNS data of the slave is erased.
- Computer Name .... [Computer Name] + [serial number] is set in
descending order.
The serial number starts from the data inputted in the [#] item. If
the item is blank, no chang is done.
4.
When DHCP is ON
and more than one slave
are selected
- IP Address ............ Unable to input.
- Gateway ................. Unable to input.
- Subnet Mask ......... Unable to input.
- DNS ........................ The data is set as it is. If Both of
the DNS data are blank, DNS is set to blank or "Auto-Obtain".
- Computer Name .... [Computer Name] + [serial number] is set in
descending order.
The serial number starts from the data inputted in the [#] item. If
the item is blank, no chang is done.
Stop
slave program
You
can stop slave program remotely.
Select
the slave to stop and click [Quit] button with holding down [Ctrl] key.
Release
"Auto-Start"
If you
install the slave program with "Setup.exe", the slave
program starts automatically when the system starts.
You
can release this "Auto-Start" remotely.
Select
the slave to release and click [Quit] button with holding down
[Shift] + [Ctrl] key.
Identify
Function
You
can display a window to show the current network setting on a slave.
To
display, select the slave and click [Identify] button.
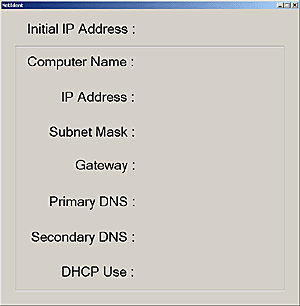
When
you send a new data to the slave, the contents are
renewed automatically.
You
can delete this window remotely.
To
delete, select the slave and click [Identify] button with holding
down [Shift] key.
ATTENTION
If
more than 3 DNS data are registered in the slave, the saved data is
limited to 2.
If
OS of the slave is Windows2000, the Computer Name is saved as
NetBIOS and DNS Name.